Street Panel
The Street Panel is a centric place for doing redefinitions of measurements and annotations using Street images that are close to the one in which the measurement or annotation has been created.
This panel only works when the active viewer is a Street viewer. If the workspace do not contain any Street viewer then it is not visible.
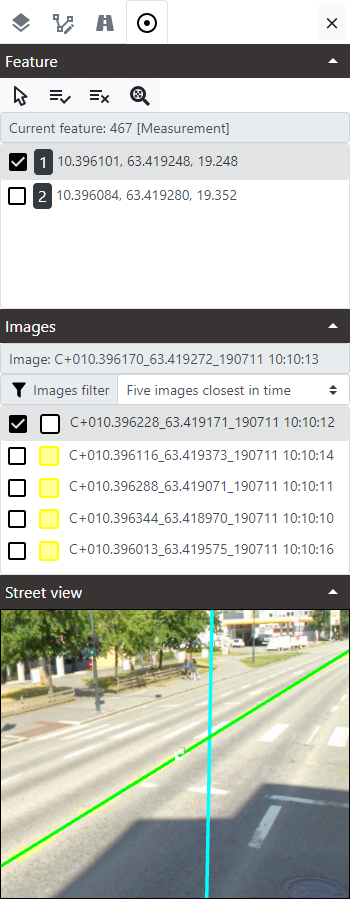
The panel has three sections:
- Feature: has the tools and shows the list of vertexes of the feature being redefined.
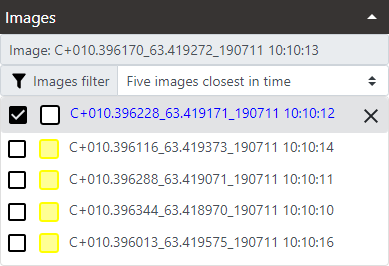
- Images: shows the list of nearest Street images that can be used to do the redefinitions.
- Street view: shows a secondary Street viewer that can be used to select correct coordinates for the vertexes.
Selecting a measurement or annotation feature for a redefinition
Measurements and annotations created inside a Street viewer can be selected for redefine them. Only one feature can be redefined at a time. For doing so follow these steps:
- Select the Set a feature in redefinition mode tool in the toolbar of the Feature section.

- Click in the active Street viewer in the workspace in any measurement or annotation feature. You must remember to make the Measurements or Annotations layer visible from the Layer panel. It is possible to click in a label in any measurement or text annotations to select it.
- The Street panel will be updated with information for the selected feature, showing the internal ID, the type of object (measurement or annotation) and the list of vertexes, and will select the first vertex in the list setting the panel with all required to redefine that vertex.
- In the active Street viewer, the feature will show vertexes with a cross icon and a number, the vertex index, that matches the number show in the panel.

Unselecting a measurement or annotation feature for a redefinition
If a feature has been selected, for unselecting it just use again the Set a feature in redefinition mode tool but clicking in the viewer in any empy space where no measurement or annotation exist. That resets the Street panel, making the vertex list and the images list empty.
Other actions the resets the Street panel are changing the Street image in the active viewer or deleting the current measurement or annotation selected using the Feature panel tools or the Shortcut Bar tools. If either the Street image changes or the selected feature is deleted, that unselects the feature, loosing any redefinition work done that is not being accepted.
Defining Street images to be used
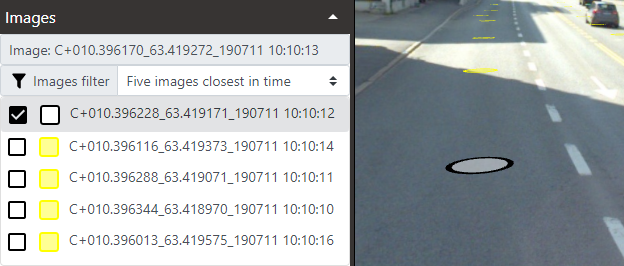
By default, when a feature is set for redefinition, the five images that are closer in time to current one in the active viewer are listed in the Street panel.
It is possible to change the default filter between the closer images in time or the closer images in distance using the Images filter dropdown in the Images section.
Be aware that changing the type of filter for the images resets any existing redefinition work that has not been accepted.

Redefining a vertex
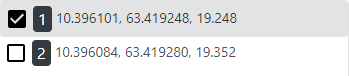
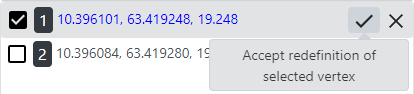
In the list of vertexes of the selected feature each one is shown as a row in the list. The row contains:
-
A checkbox indicating which vertex is the current being redefined. Only one vertex can be redefined at a time.
-
A label with the index of the vertex, starting at 1 for the first vertex.
-
The longitude, latitude and elevation of the vertex in WGS84 ellipsoid. These coordinates are the ones currently in the feature that will be changed when redefinition is accepted.
For redefining the coordinates, follow these steps:
-
Select the vertex you want to redefine in the Vertexes listbox. The list of images will be refreshed showing the best five images to redefine that vertex from the available ones in the proximity of the vertex. Each vertex will have its own best images up to a maximum of five per vertex. Images in the list are ordered by proximity, closest at the top.
-
By default the first image in the list (the closest one) is selected. Select any image in the list that you prefer to make the redefinition. It is possible to use up to five images to make it. When using more than one image the result after the redefinition will be the mean of the coordinates obtained for each image.
-
The current image selected in the list will be shown in a different way both in the Street panel and in the active viewer. In the panel it will appear with the checkbox selected and also with a black and white icon noting that that one is the current image in use for the redefinition. In the active viewer, the point in the Street layer will change its style to match that black and white style.
-
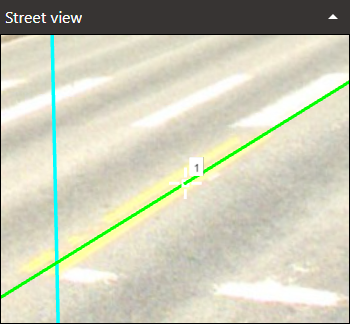
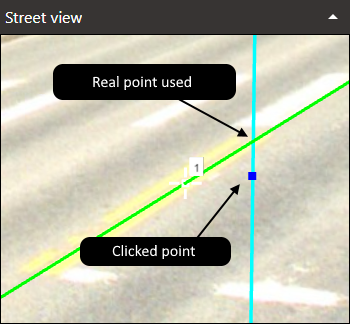
Once a image is selected in the Images listbox, the image opens in the Street viewer of the panel and the current selected vertex is shown in that viewer as a white point with a cross icon and the index label the same way the vertex is drawn in the main active Street viewer. Also a green ray is shown, indicating the line in which the correct vertex must be.
-
The Street viewer of the panel has several interactive tools active in it that work by default without the need for activating them:
- Click & drag rotates the Street view.
- Using the mouse wheel zooms in or out in the Street view.
- Clicking in any location creates a redefinition for the vertex. A new blue point indicates the location clicked but the real coordinate is at the intersection between the cyan vertical line that represents the plane for doing the cut and the green ray line that represents the line in which the new coordinate must be. If both lines do not intersect then no redefinition is done.
-
It is possible to use several images at the same time for doing the redefinition. For that change between the different images available in the Images listbox and click in the correct vertex location in the Street view. For each image the new redefined point clicked is shown as a blue point and the ID of images used for a redefinition are shown in blue in the Images listbox.
Rejecting redefinitions
Once a vertex or several vertex have redefinitions to finally commit them to the features you must accept them. Alternatively, they can be rejected. To reject follow these steps:
-
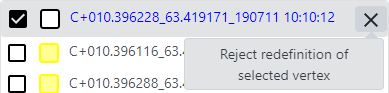
Click in the Reject redefinition of selected vertex button at the right of each image to remove the redefinition for that image. That redefinition won't be used anymore and the ID of the image in the Images listbox will be shown in normal color indicating that now that image has not a redefinition for it.
-
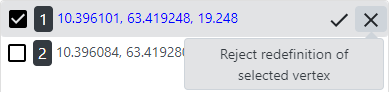
Also you can click in the Reject redefinition of selected vertex button at the right of each vertex to remove all redefinitions created for that vertex. That redefinitions won't be used anymore and now the vertex and the images in the Images listbox will be shown in normal color indicating that that vertex and its closer images has no redefinitions for it.
-
Also you can click in the Reject redefinition of all vertexes button in the Feature section
 . After a confirmation this will remove all current redefinitions from all the vertexes and now all the vertexes in the Vertexes listbox and the images in the Images listbox will be shown in normal color indicating that that vertex and its closer images has no redefinitions for it.
Accepting redefinitions
When all the redefinitions needed for a vertex or for several vertexes are done, they must be accepted in order to be commited to the feature and to update it in the active viewer. For that follow these steps:
-
Click in the Accept redefinition of selected vertex button in the right of any vertex that has at least one redefinition (vertex shown in blue in the Vertexes listbox). After a confirmation the vertex will be updated in the feature an the panel will be refreshed showing the new coordinates created. The feature remains selected in Redefinition mode for more redefinitions if needed, and the redefinitions for other vertex persist.
-
Alternatively, click in Accept redefinition of all vertexes button in the Feature section
 . After confirmation this executes a loop in all vertexes that has at least one redefinition commiting them to feature and updating the panel with new coordinates created. The feature remains selected in Redefinition mode for more redefinitions if needed.
Some considerations when redefining measurements and annotations in Street viewers:
- In the case of measurement of horizontal areas
 or horizontal polygon annotations
  only one vertex can be used for redefintion, even if there are more than one vertex redefined. The vertex cuurently selected will be used for the redefinition and the rest of redefinitions of the other vertex will be ignored. The redefinition of the vertex selected determines the height of the horizontal plane in which the rest of vertex points of the area will be projected. This way the coplanarity of the polygon geometry will be maintained.
 - In the case of measurement of vertical areas
 or vertical polygon annotations
  only the first vertex in the list will be used for redefinition, at any other redefinition in other vertexes will be ignored. The reason for this is that the first two vertex are the ones that determine the vertical plane in which the rest of vertex points will be projected.
Zooming to the current feature
If the active viewer has been moved, to return focus to the current feature in Redefinition mode use the Zoom feature button  in the Feature section.