Layer panel - Common viewer tools
This Tools section in the Layer panel allows to access a collection of the most common tools for the viewer.

The list of tools is different for each type of viewer. This list includes:
Change Layer
 This tool allows to switch between default map provider layer and ortho WMTS layer. To change which one is the default map provider it is done throught the Dashboard. Check here more info about Setting the default map provider.
Time Filter
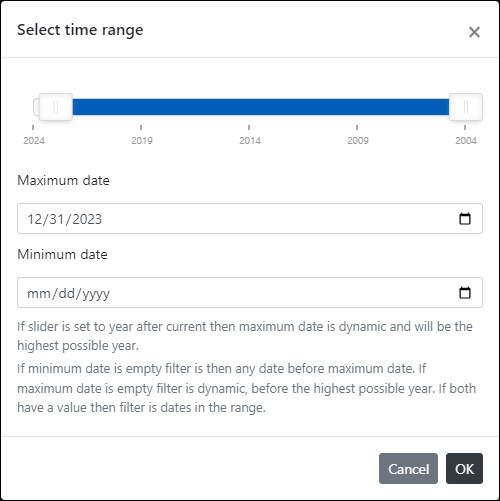
![]() Filtering source date of Mapspace baselayers by dates. The user can filter by a date range (minimum & maximum date) or using a slider to fast filter between years. Leave the maximum date empty or move maximum year in slider to the next of current one to set the maximum date dynamic, so maximum date is always the highest possible date.
Filtering source date of Mapspace baselayers by dates. The user can filter by a date range (minimum & maximum date) or using a slider to fast filter between years. Leave the maximum date empty or move maximum year in slider to the next of current one to set the maximum date dynamic, so maximum date is always the highest possible date.
Date Selector

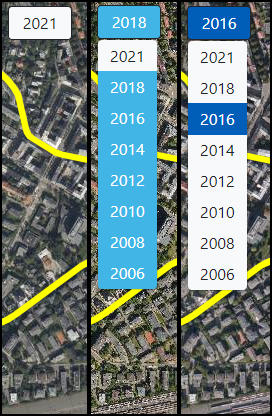
This tool is not in the Layer panel but in the upper-left corner of the 2D viewers and it is related to the previous tool, so this is the reason it is included here. The Date Selector is like a shorthand version of the Time Filter for changing the source date of Mapspace layers easier. The tool is shown as a button that renders the year with the newest possible imagery available. The button can be clicked, and then a list of years with all current available data appears for the current map coordinates and zoom level.
The control has three different modes of rendering that depends on the type of date filter set in the viewer:
- No filter: In this mode the control appears with no color (white). This mode means that the imagery shown is always the newest available, so it changes when user moves in the viewer. This mode is shown when the Time Filter slider is set to have the maximum date as the next year beyond the current one and with an empty minimum date.
- Range filter: In this mode the control appears with a pale blue. This mode means that the imagery shown is the newest available between a range of dates set in the Time Filter. This mode is shown in the Time Filter when a minimum and maximum dates are set and the maximum is not the year beyond current one.
- One year: In this mode the control appears as dark blue. This mode means that the imagery shown is the one belonging to a given year from the available ones. This mode is shown in the Time Filter when the minimum and maximum dates are the same and equal to one year.
To use the Date Selector follow these steps:
- With the selector in No Filter mode or in Range Filter mode, click in the selector to show the list of available years and then click in one of the years. That should activate the One year mode and close the list of years. The viewer will reflect the change updating the imagery accordingly. This action can be done both in Ortho and Oblique views.
- With the selector in One year mode, click in the main button to show the list of available years and click in any new year to switch to another of the available years. That should maintain the One year mode and close the list of years. The viewer will reflect the change updating the imagery accordingly.
- With the selector in One year mode, click in the main button to show the list of available years and click in current selected year to deactivate the One year mode. This will switch to the No Filter mode. The viewer will reflect the change updating the imagery accordingly.
Note: Date Selector cannot be used to set a range filter. For that use the previous Time Filter control.
Open Street image
 It opens a panorama image in the synced Street viewers by clicking on any location in the viewer. It is not needed to click in any feature of the Mapspace Street layer that usually is loaded in the viewers. That layer is there for information purposes. The tool searches the nearest Street image and request that image to be opened in synced Street viewers. If no synced Street viewer is defined then the tool does nothing. Check here more info about Synchronization between viewers
Take snapshot
 It takes an screenshot of the current view with the visible vector features. The image will be saved on the 'Downloads' folder in a Zip file when the current viewer in a Global viewer in ortho mode, or in a JPG file in any other viewer. Be aware that you can overlap some custom information over the snapshot using the Snapshot options
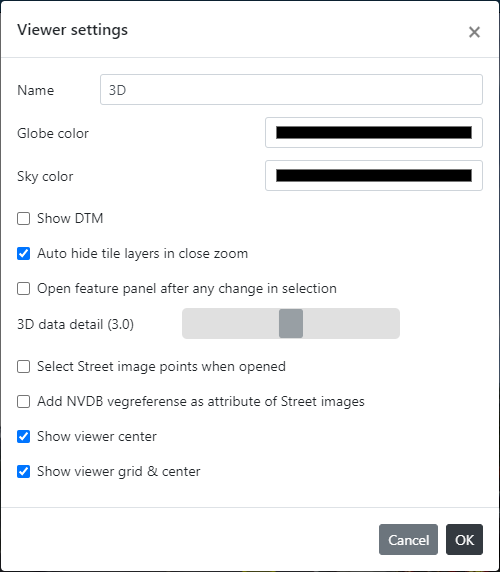
Viewer settings
 It allows to change several settings for each type of viewer:
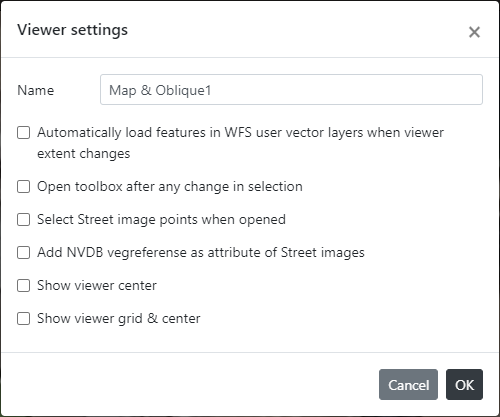
Map & Oblique viewers
Map & Oblique viewers: allow this options:
- Name: changes the name of the viewer.
- Open feature panel after any change in selection: set if automatically open Feature panel any time the selection of features changes.
- Select Street image points when opened: automatically selects the Street image point in the Mapspace Street layer whenever a Street image is opened in a linked Street viewer.
- Add NVDB vegreferense as attribute of Street images: for users with permissions to see NVDB layers allows to add the road reference as an attribute of the selected Street image point.
- Show viewer center: shows the center marker in the viewer and also can show a extra panel with debug information.
- Show viewer grid & center: shows the debug grid for tile layers and also checks the previous option.
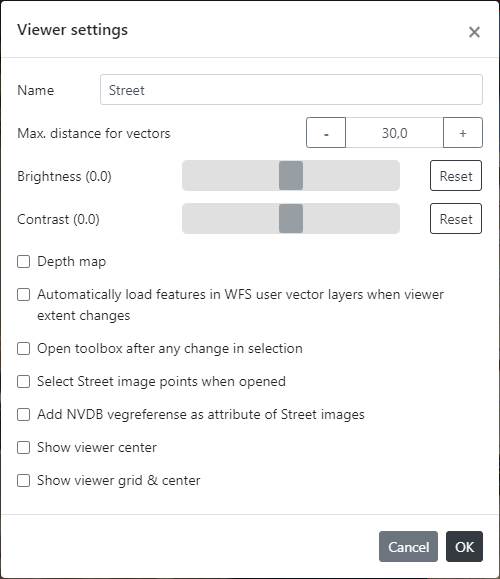
Street viewers
Street viewers: has the same options as Map & Oblique viewers and also allows this settings:
- Maximum distance for vectors: this is a limit in meters around the center of the Street image that will be used as a extent to request vector features. Features out of the extent will not be rendered. The maximum extent is 100 meters in any direction.
- Brightness: change the brightness of the Street image currently loaded. From now on all images loaded will have that brightness applied.
- Contrast: change the contrast of the Street image currently loaded. From now on all images loaded will have that brightness applied.
- Depth map: change the Street image between Depth map mode or Normal mode.
3D viewers
3D viewers: has the same options as Map & Oblique viewers and also allows these settings:
- Globe color: color for the globe that is shown as background when there are no baselayer tiles available. Defaults to blue to make it easy to visualize LiDAR data.
- Sky color: color of the sky in the scene.
- Show DTM: shows or hides the DTM terrain model.
- Auto hide tile layers: hides tile layers in closer zooms to make it easier to visualize LiDAR data.
- 3D data detail: The maximum screen space error used to drive level of detail refinement in 3D Mesh layers. This value helps determine when a tile refines to its descendants, and therefore plays a major role in balancing performance with visual quality. A tile's screen space error is roughly equivalent to the number of pixels wide that would be drawn if a sphere with a radius equal to the tile's geometric error were rendered at the tile's position. If this value exceeds maximumScreenSpaceError the tile refines to its descendants. Depending on the tileset, maximumScreenSpaceError may need to be tweaked to achieve the right balance. Higher values provide better performance but lower visual quality. Default value is 16.
Profile3d viewers
Profile3d viewers: has part of the options of the 3D viewers and also some new:
- Show viewer grid & center: Shows viewer center and a background grid.
- Show perspective mode for debugging: Allows to switch for orthographic to perspective view mode.
Download Image
 This tool is only available in Map & Oblique viewers. When in Ortho mode the tool is interactive and requires to draw an extent. When in Oblique mode the tool is not interactive and requires only a click in the tool. After using the tool a textbox appears to introduce the name for the file to be created. Then a new Download task is added to the user account. The list of tasks and the status can be checked using the next tool.
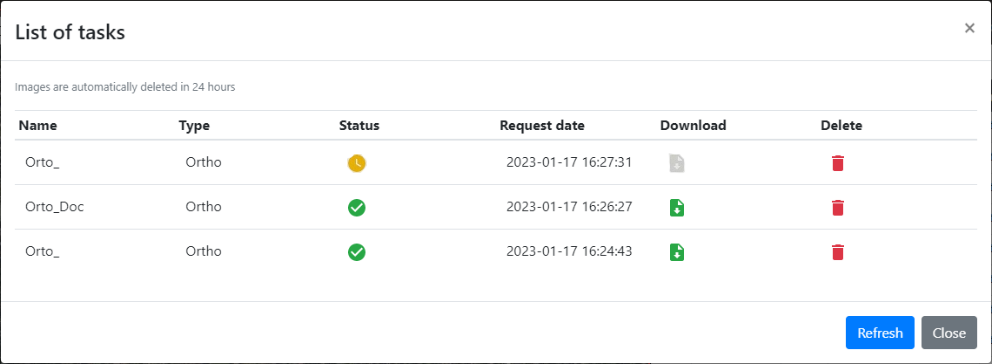
Image Download Manager
 Opens a List of taks dialog that allows to check status of tasks and download files. Just click in the Download button when status is green. Also a task can be deleted from Mapspace services.
Reverse Geocoding
 It searches the address info for a location in the viewer by a single click. The address, if found, appears in a control on the bottom of the viewer. You can copy the address to clipboard using the Copy button and close the control with the close button.

History Image Navigation

 It allows to navigate on the previous or next image loaded on Map & Oblique viewers and Street viewers.
Depth Map
 Activates and deactivates Depth Map measurement mode in Street viewers if is available.
Other useful information about viewers: