NVDB panel - Feature list with modifications
NVDB Write services
NVDB Write services allows to send changes to features through a set of online services. Changes are not inmediatly reflected in the database and online retrieving services, but the process of sending changes can be highly automated through this.
Mapspace has functionality that allows to pack a collection of changes in a JSON file that can be send to NVDB services, and track which features has been sent with the messages returned from the validation services. Currently Mapspace supports the use of these services to send changes only to road objects and using a validation system that requires that user get authorization against NVDB services.
For more information on this: NVDB Write API.
NVDB Panel
The NVDB Panel is the central place in Mapspace app for using NVDB Write Services. Here a NVDB editor user can see the list of all features modified and can send changes to NVDB and retrieve reports on the results of that sent changes.
The NVDB Panel has four sections:
- Login: for introducing the credentials for the NVDB Write services.
- Features: showing the list of modified features and also, if there exists, the reports for each individual feature.
- Changesets in progress: showing the list of changesets (any group of features sent to NVDB) that are still in progress or rejected, and also the report of the changesets as a whole.
- Changesets approved: showing the list of changesets approved, and also the report of these changesets as a whole.
The first the user needs to do to use the NVDB Panel is to log in to the NVDB Write services.
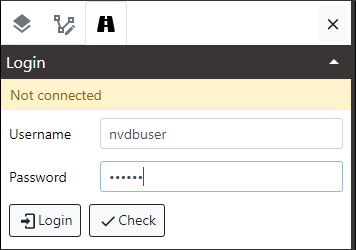
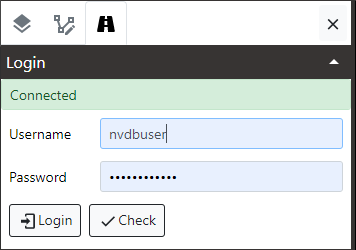
Login
In order to use the NVDB Panel and the NVDB Write services first thing to do is log in against NVDB servers. Follow these steps:
-
Open the Login section in the NVDB Panel.
-
Type the username and password provided by NVDB administrators.
-
Click in the Login button. If everything was ok a label will show the Connected state and the lists of features modified and changesets will be filled. If not an error will be shown.
-
The connection is not permanent and after some time, usually about an hour, the user is disconnected by default. This is something done this way by NVDB administrators.
-
To validate if the connection is still alive click in Check button. If connection is lost use Login button to reconnect.
-
After logging in with success, if there are currently some user changesets in progress that still has not been resolved, the NVDB Panel will start a background process to request the status of those changesets to NVDB Write services. This background process is automatic and the user does not need to do anything to activate or deactivate it. It starts on each log in, and is active all the time as long as there are changesets in progress.
-
Once the background process resolves one or several changesets, they are moved to the Changesets approved section if the changeset is approved, or left in the Changesets in progress section if the changeset is rejected, and then the Features listbox will be updated to reflect the status report sent by NVDB.
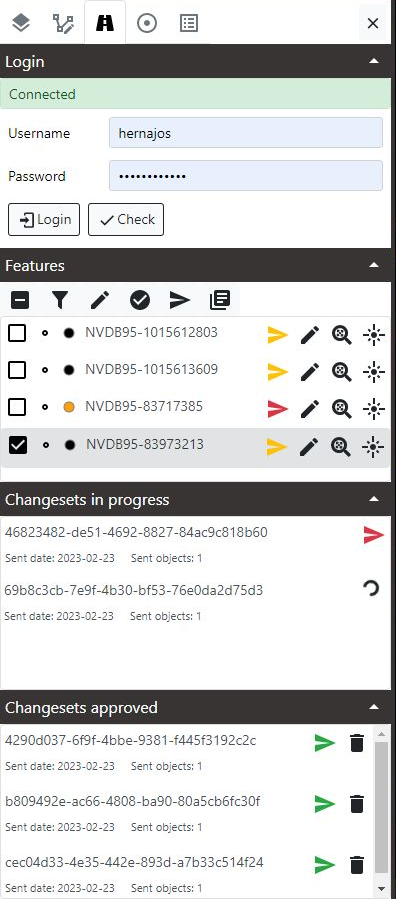
NVDB Feature list
The list of NVDB features that has modifications are managed in Features section of the NVDB Panel.
The features shown in the list are all the features that has been previously modified, marked as deleted, or that are a new NVDB created feature. These features are requested to Field Group services to know the changes made on application start. If an error happened then and the list could not be retrieved, an error will be shown during the log in. In this is the case try to solve the problem entering again in Mapspace.
Here we can see the look of NVDB Panel with the Features section maximized.
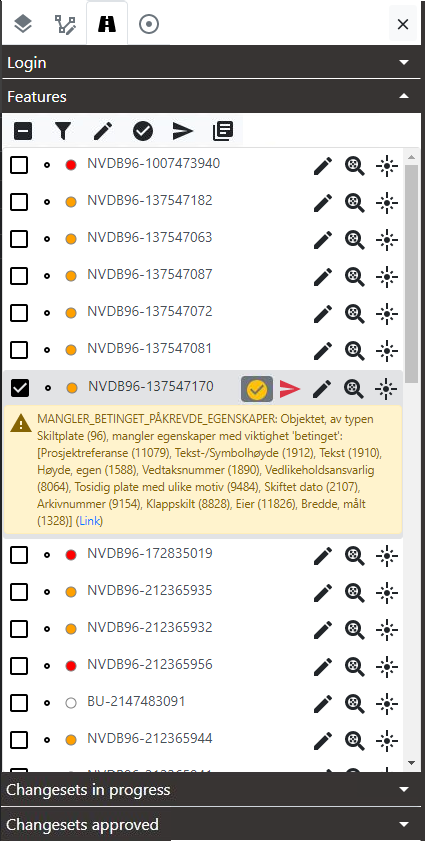
Each feature in the list is shown with these components:
- A checkbox to select the feature in the list.
- An icon with the type of geometry of the feature (point, polyline or polygon).
- An icon with the type of change made: a black dot for closed (approved) objects, a white dot for newly created objects, an orange dot for existing and modified NVDB objects, and finally a red dot for existing NVDB objects tagged for deletion.
- The internal ID used by Mapspace temporary storage services. This ID follows this convention:
- For existing NVDB objects: NVDBXXX-ZZZZZZ where NVDB denotes the object exists currently in the NVDB catalog, XXX is the ID number of the object type, and ZZZZZZ is the ID number of the object inside the object type.
- For new created NVDB objects: BUYYYYYY where BU denotes the object is new and created using Mapspace services and YYYYYY an unique ID number for the object. Be aware that this number starts as a negative number and increases towards zero as long as new objects are created.
- Optionally on the right side can be several buttons:
- Show/hide validation report button
 , with different color denoting if validation was OK or failed. When this button is clicked the validation report appears for the feature. Only features that has been previously validated in current user session show this button.
 - Show/hide status report button
 , with different color denoting if the latest report obtained for the feature has error, warning or information messages. When this button is clicked the status report appears for the feature. Ony features that have previously sent to NVDB Write Services and have obtained a resulting report show this button.
 - Add feature to viewer, select and add to Feature panel button
 . It is explained in Set features in edit mode section.
 - Zoom feature button
 . Zoom in to the feature.
 - Highlight feature button
 . Highlights the feature. This last two buttons are explained in Zooming and highlighting features section.
- Show/hide validation report button
Marking features in feature listbox
To mark features in the feature listbox you can either click in each item in the listbox, or use the chekbox in the Features toolbar:
- One click in any item selects, and a click in a selected item deselects it.
- When some or none of items is selected, a click in the checkbox in the Features toolbar selects all.
- When all items are selected, a click in the checkbox in the Features toolbar deselects all.
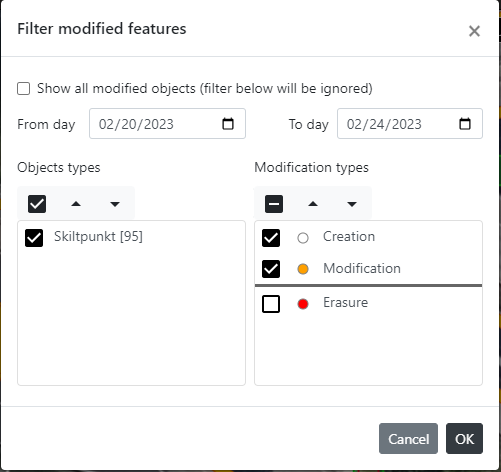
Filter features in feature listbox
If the number of features in Feature list is to high it is possible to filter them using the Filter button  in the Features toolbar.
The Filter modified features dialog will appear. Here we can set what to filter in the list. Follow these steps:
- Check the Show all modified objects checkbox and click OK to ignore all the filter settings.
- Uncheck the Show all modified objects checkbox to enable filtering controls.
- Set a range of dates for filtering modified objects between those dates. Dates can be left empty. Then the range will expand without that limit in the range. For example, leave the To day date empty to filter all modifications up to current date.
- Set the type of objects to filter in the Object types selector.
- Set the type of modifications to filter in the Modification types selector.
- Be aware that at least one type of object and one type of modification must be selected in order to filter something.
- Click OK to apply the filter to feature list.
Another way to filter features is to select one of the changesets in the Changesets listboxes, either the in progress or the approved listboxes. Then the Features listbox will show only the features sent in that changeset.
NVDB features are sent to NVDB Write services in batches called changesets. When a feature is sent it is tagged with the ID of the changeset. This ID is a UUID provided by NVDB Write services when a set of changes is sent to the services. The Changesets listboxes will be populated only if previously the user has sent some features to NVDB Write services. More on changesets and writing services in Using NVDB Write services.
Zooming and highlighting features
To zoom to a feature in current active viewer use the Zoom feature button in each element of the listbox. If no layer exist with that feature the feature is zoomed in but no feature will be shown in the location.
To highlight a feature in current active viewer use the Highlight feature button in each element of the listbox. If no layer exist with that feature then then button does nothing.
Setting features in edit mode
To put a feature in edit mode use the Add feature to viewer, select and add to Feature panel button in each element of the listbox. The feature will be searched in current active viewer. If it not exists then a new layer will be added for it if needed, and the feature will be added to the layer. If a given layer exists then the feature will be added to that layer. Then the feature will be set as the only selected feature in the layer, and as long as it is selected, it will appear in the Feature Panel so it can be started to be edited.
It is also possible to select several features in the listbox, marking them, and then use the Select features in work list and open in Feature panel button in the toolbar in the Features section. This will do the same as previous button but selecting all the features marked and adding all them to Feature panel at once.
Other useful information of NVDB functionality: