Dashboard - Create a new workspace
From the Workspaces section of the Dashboard users with superuser permissions can create workspaces. To do so follow next steps:
-
Click in the Create new workspace button.

-
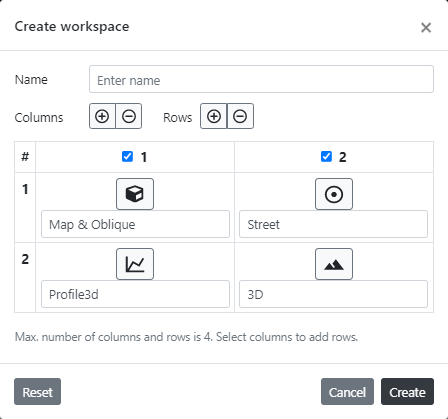
The Create workspace dialog opens.
-
Set a name for the workspace that is not already in use. A name for the workspace is mandatory or the workspace won't be created.
-
A workspace is mainly defined by its layout. The layout is a collection of columns, each one containing one or several viewers in rows. The rows in each column can be any number up to four. The maximium number of columns is also four. That gives a big amount of simultaneous viewers that the user can setup.
-
Click in the Add column button to add extra columns to the default column that the dialog creates at first time.

-
To delete an unwanted column select the column using the top checkbox in each column and then click in Remove column button.

-
To add rows to the default row the dialog creates in each column select the column using the top checkbox in each column and click in Add row button.
-
To remove the last row in a column select the column using the top checkbox in each column and click in Remove row button.
-
To change the type of viewer in each row click in the Viewer type buttons present in each row. The button will cycle in each click through the different types of viewers:
- Map& Oblique

- Street

- 3D

- Profile 3D

- Map& Oblique
-
Type a name for each viewer in the textbox under the Viewer type button.
-
To reset to initial state of the dialog click in Reset button.
-
When setup is completed click in OK button to proceed with workspace creation.
Once the workspace is created, if everything went fine, the new created workspace will appear in the workspace list. It won't be opened by default. To open it check more info in Dashboard - Manage workspaces
Other useful information about the Dashboard: