Layer panel - Synchronization between viewers
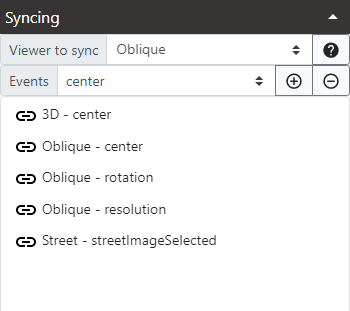
The Syncing section of the Layer panel in the Toolbox allows the management of the synchronization in a multiple viewer layout.
Each viewer can have their own synchronization preferences. So each viewer must be independently configured.
Default Workspaces have a predefined synchronization settings. The creation of workspaces with multiple viewers have by default a basic synchronization configuration. In any case, superusers have always the option to manage the synchronization settings.
To add a syncronization option follow these steps:
-
Make one viewer the active viewer by clicking in it. The Syncing options will update to show current syncing options for that viewer. Now this viewer is the viewer being edited.
-
In the Viewer to sync dropdown select a viewer to be synced with active one. That viewer will change anytime the viewer being edited changes.
-
In the Events dropdown select the type of synchronization:
-
Center: changes the center location on the synced viewer matching the viewer being edited. In case of Map & Oblique viewers in Oblique mode if the center is outside the current loaded image, a new image is loaded and then centered. In case of Street viewers always a new image is loaded that is the closest to the center location.
-
Rotation: changes the rotation angle on the synced viewer matching the viewer in edition.
-
Resolution: changes the zoom resolution on the synced viewer matching the edited viewer. This sync option only has sense in Map & Oblique viewers.
-
Street Image Selected: this sync option has different behaviour depending on the type of viewer where it is defined:
- for any type viewer syncing with a Street viewer, it opens the Street image selected using the Open Street Image tool.
 Check Layer panel tools for more info on this tool. This sync option only can be set with Street viewers.
 - for a Street viewer syncing with a Map & Oblique viewer, it shows the current Street image as selected in the Mapspace Street images layer.
- for any type viewer syncing with a Street viewer, it opens the Street image selected using the Open Street Image tool.
-
FOV (Field of View): shows a FOV representation of a Street viewer for the loaded Street image in the synced viewer. This sync option only can be defined for Street viewers and Profile3d viewers syncing Map & Oblique viewers.
-
CenterOffset: changes the camera location offset on the synced 3D viewer according to the offset in the viewer being edited.
-
Pitch: forces the camera pitch angle on the synced Street viewer or 3D viewer according to the angle on the Street viewer or 3D viewer being edited.
-
Profile3dSelected: opens the synced Profile 3D viewer to show the selected profile. We must previously create a profile in the active Map and Obligue viewer.
-
All synchronizations can be activated/deactivated by clicking on synchronization icon ![]()
![]()
Be aware that synchronization settings, although they start working inmediatly when changed, are not automatically saved in the current opened workspace. You must save the workspace using the Save workspace button in the top menu of the web app in order to make them persistent for future sessions.
Other useful information about viewers: