NVDB layers
Adding NVDB objects as layers
To add a layer containing NVDB objects, follow next steps:
-
Make a viewer the active one clicking inside it.
-
Open the Toolbox.

-
In the Toolbox select the Layers panel.
-
Click the Add layers button.

-
The Add layer dialog opens.
-
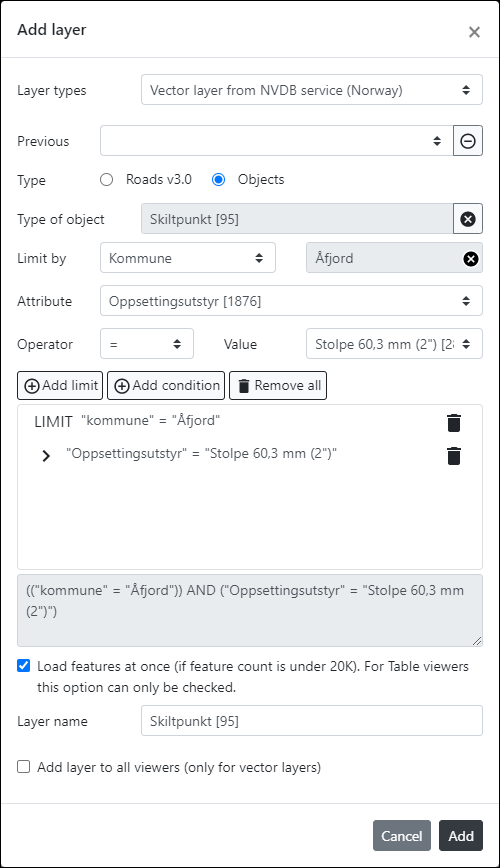
Select Vector layer from NVDB service (Norway) in Layer types selector.
-
Select the type of NVDB object to add: Roads v3.0 for NVDB road subsections using the version 3 of NVDB API; Objects for NVDB road objects. When the later is selected the options below become available. These options, including the filtering options, are only for the case of a NVDB road objects layer. Each time the type of NVDB object is changed the layer name is filled automatically. Each layer can only have one type of object.
-
In the Type of object input box you can select the type of object to request in two different ways:
- Click inside the input box. The full list of object types appear. Then use arrow keys in the keyboard and press Enter in the desired object type, or click on it.
- Type some characters in the input box, either a part of the object type name or the ID. The list of object types will be filtered to those containing the chars typed. Then use arrow keys and Enter in the keyboard or click in the desired object type.
-
The clicked object type will be shown in the input box and it will change to read-only mode. To modify the object type to another one, click in the Reset button (button with a X icon) at the end of the Type of object input box.
-
To load all the objects in just one request use the checkbox Load features at once. This only works if the count of objects that are going to be loaded is less than 20.000. If the number exceeds that then objecst will be requested as usual. This option is forced as required in Table viewers. Check in Loading layers for more info.
-
Type a name for the layer (required) in the Layer name textbox if the default automatically filled is not the one desired.
-
If filtering in the objects is not needed, then click in OK button in to add the layer to active viewer.
-
If you need to filter the objects from NVDB proceed to explanations below.
-
Once a layer definition is created, it is added to the Previous dropdown and will persist during the current user session. If the same layer definition is needed for other viewers just select its layer definition in the Layers dropdown and click in OK button of the Add layer dialog.
-
To add the same layer to all viewers then check the Add layer to all viewers checkbox. The layer will be added not only to current active viewer but also to the rest of viewers (no matter if they are visible or not). This has the advantage that the layer will be created with the same color styling in all viewers.
Note: Be aware that when adding the same layer to all viewers the layer is fully cloned, so each layer in each viewer has its own features. That means that when an NVDB feature is modified in one viewer the web app must take care of these changes to NVDB features and sync them to other viewers. This synchronization is only done for NVDB objects and is not available for other type of vector layers.
It is entirely possible to have the same type objects in different layers with the same or different definition, for example, with different filters.
It is not possible to re-define a created layer definition. In that case, create a new one. For removing a given layer definition, select it in the Previous dropdown and click in the Remove button. 
Filtering layers
A filter is composed of a collection of limits and conditions. Limits are usually spatial filters that return features only if they are contained inside other objects. Conditions are usually alphanumeric filters that return features only if a given attribute comply with certain values.
To apply a filter when defining a layer follow these steps:
- To add a limit select the type of limit in the Limit by dropdown. Then you can select the limit value in two different ways:
- Click inside the Limit input box. The full list of values appear. Then use arrow keys in the keyboard and press Enter in the desired value, or click on it.
- Type some characters in the Limit input box, with any part of the value. The list of values will be filtered to those containing the chars typed. Then use arrow keys and Enter in the keyboard or click in the desired value.
- To add the limit click in the Add limit button.

- To add a condition select an attribute in the Attribute dropdown, then an operator in the Operator dropdown and finally select or type a value in the Value dropdown or input. Then click in the Add condition button.
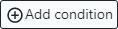
- To remove a limit or a condition click in any Remove button
 in the list of limits and conditions or alternatively, to remove all limits and conditions at once, click in Remove all.
- Limits and conditions are automatically concatenated once they are added. Limits are always an OR condition, so the type of concatenation cannot be changed for them. Conditions are concatenated by default using the AND operator. To change the concatenation operator of a condition between AND and OR click in the concatenation button.

For example, here we can see how to define a filter that concatenates one limit and two conditions with two allowed values for an attribute:
At the bottom of the filter section a text area gives a preview of the filter that is being defined. This is not exactly the string that will be used to made requests to NVDB services, but a way to give an idea of the query to execute. The query is not validated against NVDB services here, it is done when it is used through the creation of the layer. A layer must be added to check if any object is returned.

For more complex filters, it is possible to add a second level in conditions for grouping them. For this follow the next steps:
- Use the Add condition to group button
 and Remove condition from group button
  to create groups in the conditions. The Add Condition to group button starts a new group if there is not a previous condition grouped, or adds the condition to a previous group. The Remove Condition from group button removes a condition from the group it belongs.
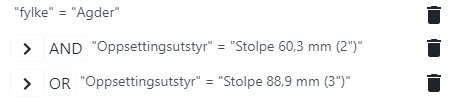
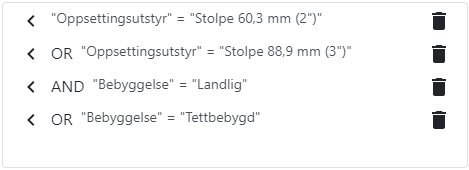
For example, to create the filter shown below, follow the instructions in the order given:

- Add the condition "Oppsettingsutstyr" = "Stolpe 60,3 mm (2")"
- Add the condition "Oppsettingsutstyr" = "Stolpe 88,9 mm (3")" and change concatenation to OR.
- Add the condition "Bebyggelse" = "Landlig" and leave the concatenation to AND.
- Add the condition "Bebyggelse" = "Tettbebygd" and change concatenation to OR.
- Click Add condition to group button in the first condition to start a group there.
- Click Add condition to group button in the third condition to start a group there.
- Click Add condition to group button in the second condition to add it to the first group.
- Click Add condition to group button in the fourth condition to add it to the second group.
As you can see it is a bit tricky at first, but it is easy to define complex filters with this method. Finally the dialog will be like this:
Loading objects in layers
Once layers are added objects are requested only under given requirements. As NVDB objects can be numbered in thousands of them, download all the objects of a given type for all the country could cause performance issues in both NVDB servers and the Mapspace client.
In order to retrieve objects each type of viewer has its own requirements:
- Map viewers only request objects every time the extent of the map changes and if the resolution of the zoom level is less than 5.0 meters. If you find that objects are not loading, move the map and/or zoom closer.
- Oblique viewers request all the objects that lie inside the extent of the oblique image each time the image changes.
- Street viewers request all the objects that lie inside the limit extent defined for the Street viewer. See Street viewers settings to define the maximum distance (extent) for Street viewers.
- 3D viewers only request objects every time the camera location in the globe scene finalizes a change and an estimated resolution for the given height of the camera is less than 5.0 meters (if the camera would be facing straight down). If you find that objects are not loading, move the 3D view and/or zoom closer to ground. Also tilt the camera towards the ground.
To override these normal system for requests, it is possible to check the option Load features at once when defining the layer. If the count of objects is less than 20.000 then only one big request will be made in the creation of the layer and no more requests will be made when changing the view extent. If the count is bigger than 20.000 then the Load features at once option will be ignored and objects will be retrieved using the system explained above. Be aware that through the use of filters it is possible to retrieve a lesser number of objects under the 20.000 limit, so using a combination of filters and Load at once option it is possible to load objects in a more performant way.
Saving NVDB layers
Mapspace app only persists two types of vector layers: Measurements/Annotations layers and any remote server vector layer. As NVDB layers are remote layers that connect to NVDB services, the definition of the layers are persisted each time the workspace is saved. So to save the layers in the workspace just save the workspace. This option is only available to users with superuser permissions.
Note: Individual features are not persisted inside the workspace, only layer definitions. Changes to NVDB features are persisted in special Mapspace service each time a feature is changed. Features that remain unchanged are never persisted and always requested to NVDB services.
Managing layers
Once a layer is created for a given type of NVDB objects, then any of the tools available for vector layers in Mapspace work with NVDB layers.
Check here for explanations on common tools for managing layers:
- Change visibility of layers
- Remove a layer
- Zoom to the layer extent
- Change the style of the layer. Only NVDB layers with road objects can be changed the style. Any road subsections layer has a predefined style function that cannot be changed.
- Change the visibility priority
- Select features by attributes
- Export a vector layer. As NVDB are remote layers that download features on demand, exporting tool only exports to a local file the current downloaded features that are cached in memory in the user session.
Other useful information of NVDB functionality: