NVDB Feature panel - Editing attributes
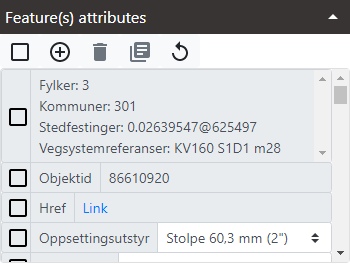
Marking attributes
For marking attributes the functionality is exactly the same of generic features. Check how to mark attributes in the Attribute list in Feature panel - Attributes.
Adding a new attribute
To add a new attribute to a NVDB feature or features follow these steps:
-
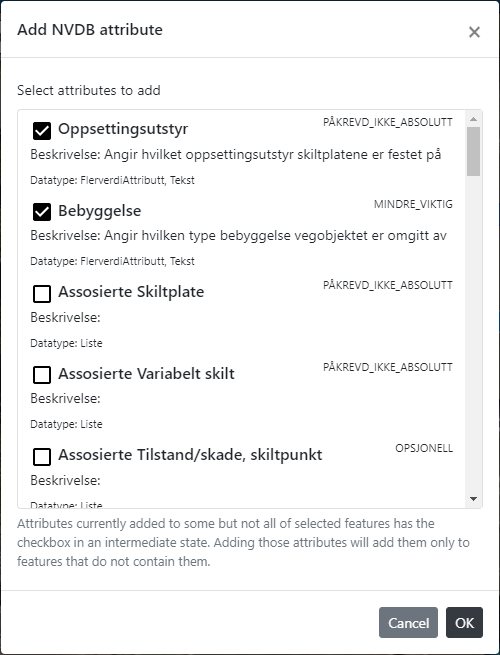
Click in the Add attribute button.

-
The Add attribute dialog opens.
-
The dialog shows the list of allowed attributes for the current selected NVDB layer. Each attribute is a row in the list, with this components:
- a checkbox to select the attribute. The current added attributes appear as marked.
- the name of the attribute, after the checkbox
- the type of requirement for the attribute, if it is mandatory or not (the NVDB code) on the right.
- a description of the attribute (beskrivelse) if exists,
- the datatype of the attribute, as the NVDB name for the datatype
-
Check the attributes to add.
-
The attribute will be added to all the current features marked in the Feature list. Attributes currently added to some but not all of marked features in the Feature list will have the checkbox in an intermediate state.
 Adding those attributes will add them only to features that do not contain them. If any attribute added has defined a default value for it, then that value is set after adding the attribute.
 -
Changes in features are persisted in Mapspace temporary storage services. Features existing in NVDB database are shown as modified (orange dot).
Note: Be aware that some NVDB data types are not currently supported as editable in the Feature panel. That include these datatypes: "Struktur", "BinærObjekt", "Autogenerert verdi", "Liste", "Assosiasjon" and "NettNodeEllerPunktT??". It is possible to add attributes with these data types, but they will be useless because cannot be edited.
Removing attributes
To delete an attribute follow these steps:
- Mark one, several or all attributes in the Attributes list.
- Click in the Delete attribution button.

- Confirm in the confirmation message.
- The attributes will be removed from all the marked features in the Feature list.
Some attributes are fixed and cannot be deleted. If only fixed attributes are marked, a warning message will appear.
Copying attributes to clipboard
For copying attributes to clipboard the functionality is exactly the same of generic features. Check how to copy attributes in the Attribute list in Feature panel - Attributes- Copy attributes to clipboard.
Reseting attributes
For copying attributes to clipboard the functionality is exactly the same of generic features. Check how to copy attributes in the Attribute list in Feature panel - Attributes- Copy attributes to clipboard.
Modifying attributes
To modify an attribute use the control that edits the attribute either typing or selecting a value. For attributes that has a set of allowed values, there will be a dropdown with those values. This avoid accidental errors typing data. For attributes that contain geometries check NVDB Feature panel - Editing features about how to edit them.
Once a value is changed the new value is saved in Mapspace temporary storage services and persisted. Existing features in NVDB database are shown as modified (orange dot).
Showing NVDB vegreferanse as an attribute of opened Street images
To open Street images, users with permissions can do that using the Open Street image tool from the Viewer tools menu or the Viewer shortcut bar.
For NVDB users, this tool can be extended with extra funcionality. To activate this functionality, follow these steps:
-
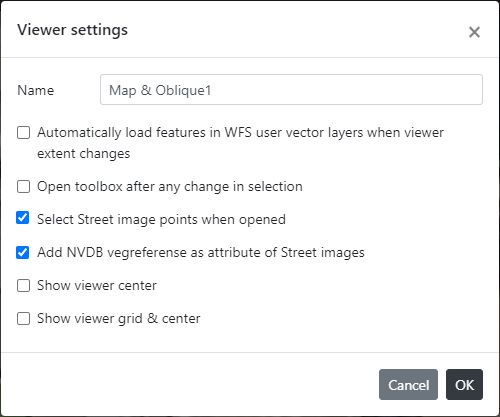
Open the Viewer menu, select the Tools section and click in the Viewer settings button.

-
The Viewer settings dialog opens. NVDB users will have a couple of checkboxes added in the dialog.
-
Check the Select Street image points when opened checkbox to do an automatic selection of a Street image point each time a Street image is loaded.
-
Check the Add NVDB vegreferanse as attribute of Street images checkbox to add the NVDB vegreferanse (the ID of the road point) as an attribute of the Street point.
Be aware that if Select Street image points when opened checkbox is checked and the Street point of the Street image opened do not exists currently in the Mapspace Street layer, then the point is requested and added. If this option is complemented with Open toolbox after any change in selection option, then each time a Street image is opened, its attributes will be shown in the Feature panel.
Be aware that each viewer has its own instance of Mapspace Street layer so you must configure this settings in each viewer in order to see the attributes of the Street images selected in them.
To show the NVDB vegreferanse in the attributes of Street images, follow these steps:
-
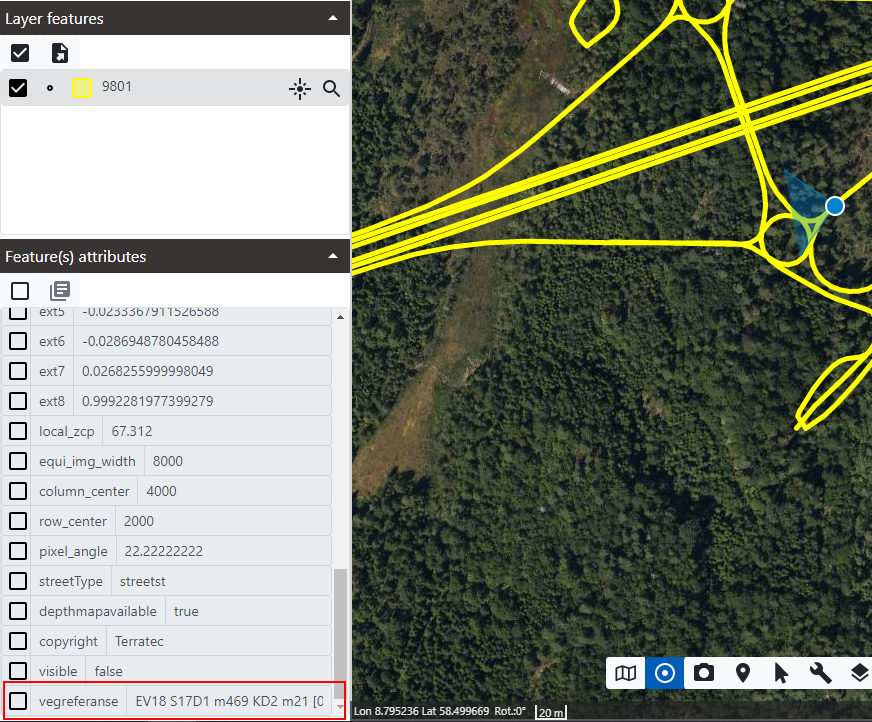
Select the Open Street image tool and use it. This tool requires to have certain syn options set.
-
If an image is opened and the Feature panel is opened then you will see the attribute with the vegreferanse in the Feature panel. Both the v.2 and the v.3 of the Road reference will be shown in the added attribute.
Other useful information of NVDB functionality: